Easy Techniques of Getting Raw Output to Command Line
Essential Linux Command-Line Tricks for Computer Vision Researchers
In this post, we go through some useful command-line tricks which can help Computer Vision engineers to speed up their day-to-day R&D.

Introduction
I never forget my very first day working with the test server where I blew it up by accidentally running rm -r * on the root directory and leaving the DevOps guys speechless!!

After this experiment, I learned two important things:
- One, keep your head up while typing!
- Two, I need to get better with the command line.
Linux has huge popularity among the data science community especially deep learning engineers. because whenever it comes to training deep learning models like YOLO, RCNN, or BERT, They have to go through MLOps to make sure the installed packages are very well integrated with the operating system and hardware. But among all its cool features, I think, its command-line is something else. its simplicity, diversity of tools, easy integration with state-of-the-art technologies, and its' agile nature make it very unique for research and development for data science.
Jeroen Janssens has categorized command-line advantages very well in his book "Data Science at the Command Line":
The command line is agile: This feature makes it a great fit for data science exploratory nature. because you want results just in time.
The command line is augmenting: integrates well with other technologies. (for example Jupter Notebook, Colab and etc…)
The command line is scalable: Since you are not using a GUI and you actually typing commands and each command has many arguments, it can fit your need easily.
The command line is extensible: The command line itself is language agnostic. So you can develop and extend its functionalities without worrying about the language.
The command line is ubiquitous: the command line comes with any Unix-like operating system. most of the supercomputers, Embedded systems, servers, laptops, cloud infrastructure use Linux.
In this post, I would like to introduce some tips over Linux commands that I use for projects a lot mainly because I find it mandatory to write a python script for every one of the procedures.
I divided the commands into 2 main categories:
- The first category includes the commands that are useful when working with remote servers and files
- The second one includes the commands that help with the image/video manipulation.
Working with remote server and files
1. Check dimensions of the image
Sometimes on the remote server, you are working on data and do not have any GUI to see the image dimensions. You can check the image dimensions with this command:
            linux@user-pc:~/some/path$ identify image_name.png
>>> image_name.png PNG 1920x1080 8bit sRGB 805918B 0.000u 0:00.000
if you want to use it for several images in a directory (maybe you want to combine them as a clip, but some of them don't have the same dimension as others!), use *.png instead of image_name.png
I used to use this script in python:
2. Count the images on the directory
After creating datasets in some directory, I often check if the count of images and labels are equal. (since I use jupyter notebook, sometimes there is a hidden directory named as .ipynotebook and does not appear when you use ls command and that makes troubles when data generators start fetching data from that directory).
- To count all images:
ls path/to/images | wc -l - To check only
pngformat files:
find -name *.png -type | wc -l - To check the directories with the storage size:
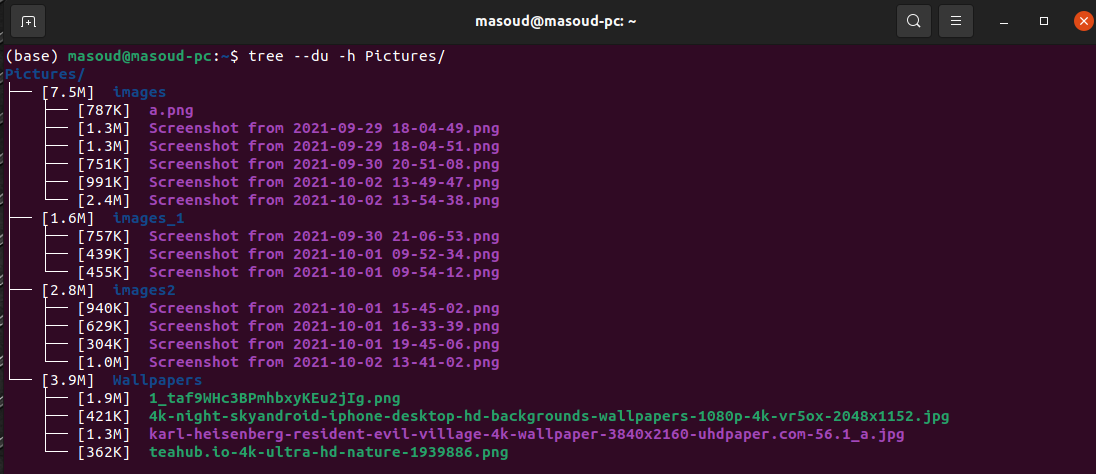
du -lh --max-depth=1 - You can also use
tree -du -h Path/to/imagesto check the images with the disk storage they consume.
The output of the command tree is more visually organized which would look like this one:
3. Copy files to/from a remote server from/to local PC
It often happens that we need to upload data to a remote server (or download from it). To do that You should use scp command in this way:
- first I recommend you to zip the folder with this command:
zip -r output.zip path/to/images path/to/labels - To download, you should use this command on your local PC:
scp remote_user@remote_host:remote_path local_path
for example:
scp user_1@111.222.333.444:/home/user_1/path /home/local_user/path - To upload, switch the source and destination:
scp /home/local_user/path user_1@111.222.333.444:/home/user_1/path
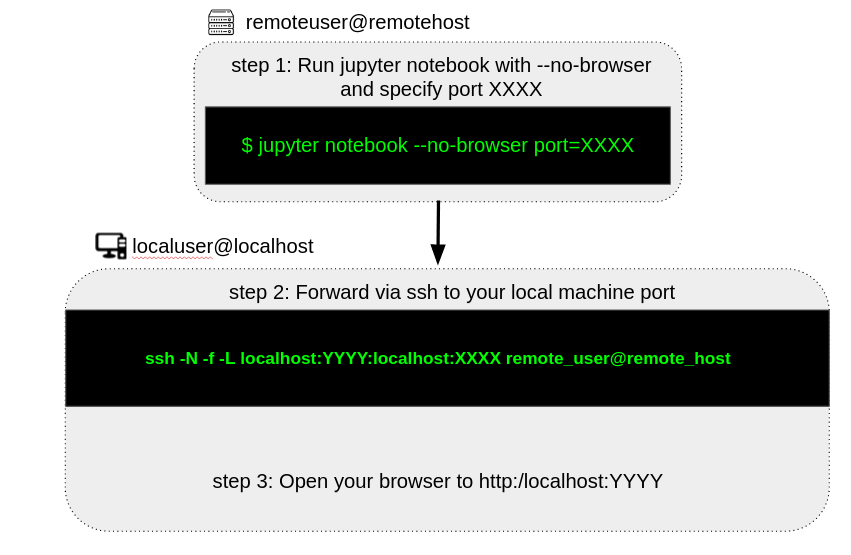
4. Running jupyter notebook on a remote server
jupyter notebook helps researchers with both scripting and visualization.
To use it on the local PC while running on the remote host, we use these commands on the local machine and remote host to portforward jupyter notebook on local:
- Running jupyter notebook on the remote server:
jupyter notebook --no-browser --port=XXXX - Portforwarding local port to remote port:
ssh -N -f -L localhost:YYYY:localhost:XXXX remote_user@remote_host
5. Run ML model training/evaluation with TMUX
I used to suffer a lot from network disconnection during the ML model training sessions which sometimes made me go back to square one and train the model from scratch again!
So I found tmux utility so fascinating solution for the time that you want to detach processes from their controlling terminals which allows remote sessions to remain active without being visible.
it's really easy to work with tmux.
- to start a tmux session, just type
tmux. - to rename the session, type
rename-session -t some_random_name(only if you have activated the session). - then you can run your process and detach from it by pressing
CTRL+Band thenD. - to attach the session, you can use
tmux attach -t some_random_name. - to kill the session, execute
tmux kill-session -t yolo
You can learn more details in this awesome youtube video:
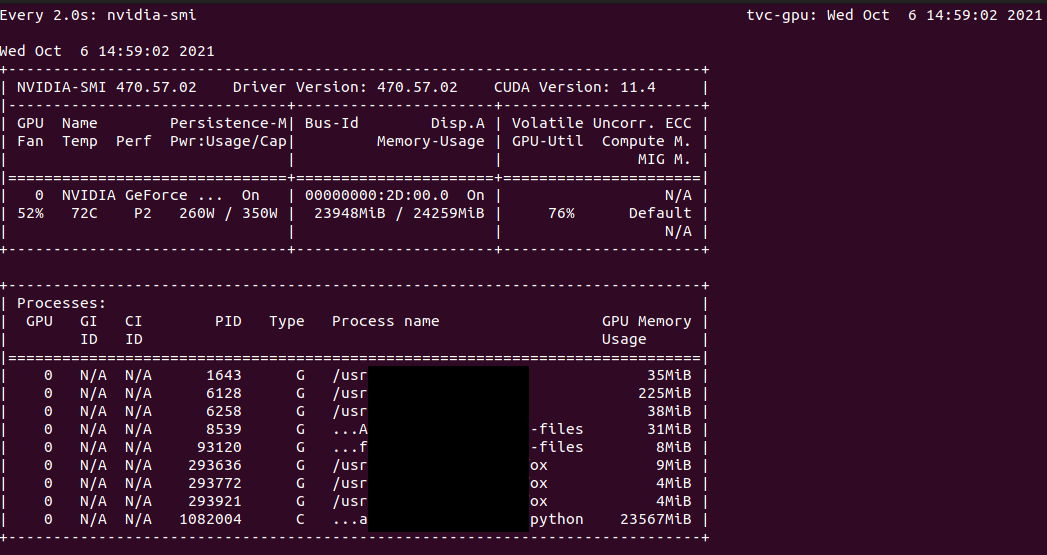
6. Watch your training session and GPU resources
If you work on a team, you probably experienced competition over GPU resources with colleagues!! To have an eye on GPU usage (to realize when it's not used by others), use these commands:
watch -n nvidia-smi
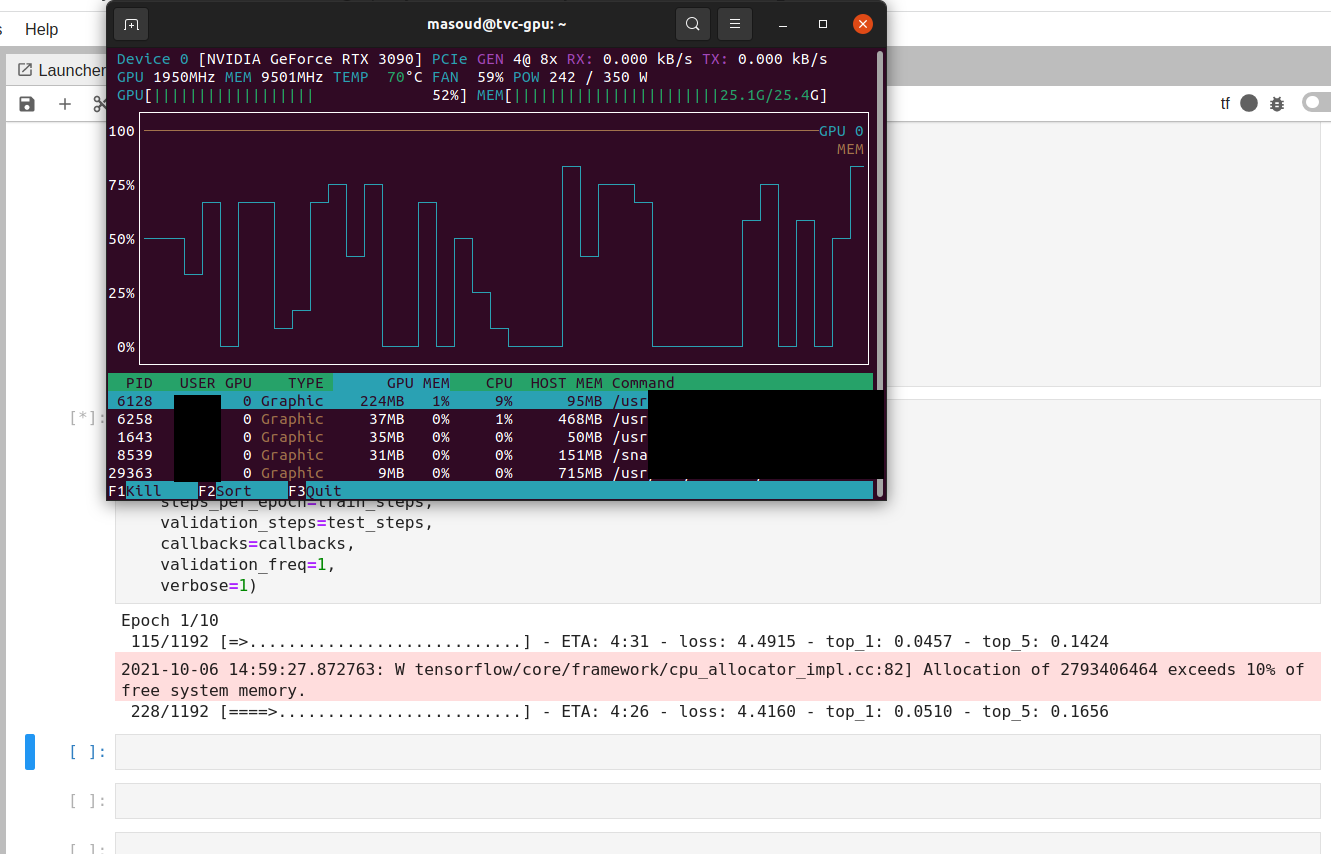
nvtop (better visualization):
gpustat (it's more suitable for admins to watch multiple GPU simultaneously)

Sometimes when you start training your ML models, you log the results in some text file. for example the Detectron2 framework or YOLOV5 logs metrics (accuracy, loss, ….) on some txt file for each epoch.
So if I don't have access to tensorboard , I would use this command to check the results on the last 5 lines which would be updated every 100 seconds:
watch -n 100 tail -n 5
I save checkpoints according to loss and accuracy values and name the weights with their corresponding loss and accuracy. so I can sort them in the command line and check the last checkpoint accuracy with this:
ls checkpoints/* | sort | tail -n 1
6. Creating gif plots to show time series images
I use the GradCam algorithm to visualize the activation layer feature extraction heatmap on test images using the tf-explain module. I often generate gif out of the plots to know how the training process affected the model accuracy. To convert images in a directory to a plot, you can use this command:
convert -delay 10 -loop 0 *.png animation.gif And results in:
Full project available on Kaggle:
If you want to convert a video to a gif, you probably notice that the output gif would get very big in size. So the best way to reduce the size of the gif is to sample from video. To do that, use -r which is sampling FPS:
ffmpeg -i video.mp4 -r 10 output.gif
Video/Image manipulation
ffmpeg is a must-have skill for a computer vision engineer because she/he has to manipulate videos/image data. ffmpeg has lots of tricks which I only share a few of them here. if you want to read more about ffmpeg please have a look at these books:
1. Check video duration
Use this command:
ffmpeg -i file.mp4 2>&1 | grep "Duration"
The output would be this:
Duration: 00:05:03.05, start: 0.00000, bitrate:201 kb/s
2. Convert video format:
To do that:
ffmpeg -i video.mp4 video.avi
if you only need the audio from the video:
ffmpeg -i input.mp4 -vn output.mp3
3. Generate dataset from videos
Sometimes we might need to generate a dataset from videos where some action happens very rarely like detecting rare actions or rare objects which can be called "Anomaly detection". To do so we need to go through videos up to hours of recording. I use this command to cut some parts of the video:
ffmpeg -ss 00:10:00 -i input_video.mp4 -to 00:02:00 -c copy output.mp4
in this command:
-
-ss: starting time -
-i: input video -
-to: time interval like 2 minutes. -
-c: output codec
if you want the video without audio:
ffmpeg -i input_video.mp4 -an -c:v copy output.mp4
-
-anis used to make output without audio.
4. Generate a sequence of frames for ConvLSTMs or 3d CNNs
ConvLSTM and 3d-CNN networks are designed to extract spatiotemporal features of video sequences. So to work with those networks, we have to generate a sequence of frames for their input tensors. Use this command to generate images from videos for 20 seconds:
ffmpeg -ss 00:32:15 -t 20 -i videos.ts ~/frames/frame%06d.png
you can add scale to rescale the image dimensions. I mostly get videos in 1028x540 which its width must be halved. this is the command to do so:
ffmpeg -ss 00:10:00 -t 20 -i video.ts -vf scale=iw/2:ih output_path/frame%06d.png
or you can simply put the dimensions:
ffmpeg -ss 00:10:00 -t 20 -i video.ts -vf scale=960x540 output_path/frame%06d.png
5. Crop a bounding box of video
This is how you can simply crop a box of a video clip:
ffmpeg -i input.mp4 -filter:v "crop=w:h:x:y" output.mp4
6. Stack videos along with each other
On TVConal startup, I work on sports analytics projects where sometimes we want to check different video feeds are in synchronization with each other or not. I just found this amazing StackOverflow answer so related to this problem and what I share here, is an insight from the mentioned post.
Since I'm a huge fan of VolleyBall (my favorite player is the king of setters "Saeed Marouf" ), I chose to test the commands on video footage of volleyball. Videos names are a.mp4 — b.mp4 — c.mp4 — d.mp4 and credit goes to Pavel Danilyuk from Pexels.
6.1 — Stack videos horizontally:
To stack feeds along the horizontal axis, we use this command:
ffmpeg -i a.mp4 -i b.mp4 -filter_complex hstack output.mp4
6.2 — Stack videos vertically:
To stack feeds along the vertical axis, we use this command:
ffmpeg -i a.mp4 -i b.mp4 -filter_complex vstack=inputs=2 end_vstack.mp4

6.3 — 2x2 grid stacking with xstack
Now let's try something more complex:
ffmpeg -i a.mp4 -i b.mp4 -i c.mp4 -i d.mp4 -filter_complex "[0:v][1:v][2:v][3:v]xstack=inputs=4:layout=0_0|w0_0|0_h0|w0_h0[v]" -map "[v]" 2x2.mp4
Conclusion
I believe command-line along with python would make a powerful set of tools for the data science community. We all know that during R&D and fast-paced development, time management is so critical. So using such powerful tools allows us to waste less time on simple tasks during the day. I cannot dispute the fact that there are a lot more useful command-line tricks out there that I did not include in this article like Docker which comes in handy handling DevOps, but I would like to write about Docker in a separate article.
I also appreciate those of you who know more useful command-line for the computer vision community and can share them with me.
My Online Profiles:
- My LinkedIn
- My StackOverflow
- My Github repository
- My Kaggle Repository
References
- https://ljvmiranda921.github.io/notebook/2018/01/31/running-a-jupyter-notebook/
- https://en.wikipedia.org/wiki/Tmux
- https://ostechnix.com/20-ffmpeg-commands-beginners/
- https://unix.stackexchange.com/questions/233832/merge-two-video-clips-into-one-placing-them-next-to-each-other
- https://askubuntu.com/questions/648603/how-to-create-an-animated-gif-from-mp4-video-via-command-line
- https://stackoverflow.com/questions/11552565/vertically-or-horizontally-stack-mosaic-several-videos-using-ffmpeg/33764934#33764934
gilleycomprignate.blogspot.com
Source: https://towardsdatascience.com/essential-linux-command-line-tricks-for-computer-vision-researchers-27d4f013d9a
Post a Comment for "Easy Techniques of Getting Raw Output to Command Line"